INSTALLATION PROCESS
The following is a summary of how the AHRENS process works.
Illustrations A and B will help you visualize the step-by-step procedure.
(KEY TO ILLUSTRATIONS : 1. Vibrating
Bell ; 2. Hand Winch ; 3. Cord to Control Box ; 4. First Liner Mix ; 5.
Second Liner Mix ; 6. Second Liner Applicator.)
 FIRST
LINER INSTALLATION FIRST
LINER INSTALLATION
- A correctly sized steel bell is lowered down the flue on a steel cable
- attached to a hand winch set on top of the chimney.
- The AHRENS zero slump first liner mix is poured down the flue to cover
the bell.
- Once the bell has been covered with mix, the vibration placement of
mix starts. Each bell houses a vibrator and the intensity of the vibration
is adjusted from the control box.
- As vibration continues, the bell is slowly winched up through the
mix and the process is repeated until the bell reaches the top of the
chimney.
GLAZE-SETtm APPLICATION (NOT
SHOWN)
- Immediately after the first liner installation, Glaze-Settm
is sprayed on the flue wall with a portable sprayer.
- Minutes later the first liner is ready for the second liner installation.
- If Glaze-Settm is used, it makes the AHRENS system a one-day
process.
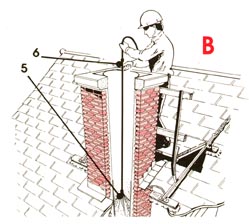 SECOND
LINER INSTALLATION (Ill. B) SECOND
LINER INSTALLATION (Ill. B)
- After the first liner has properly set, a foam rubber applicator is
positioned in the top of the flue.
- The second liner mix is poured over the foam rubber applicator and
the applicator is lowered down the flue - or -
- The second liner can be applied with a sprayer.
- The glaze-like second liner is absorbed into the first liner and leaves
a thin coating on the entire flue surface including horizontal openings
at thimble and cleanout door locations.
|